9.12.2019

YARN 8 Book-a-Zine: How to Make Felted Mitts

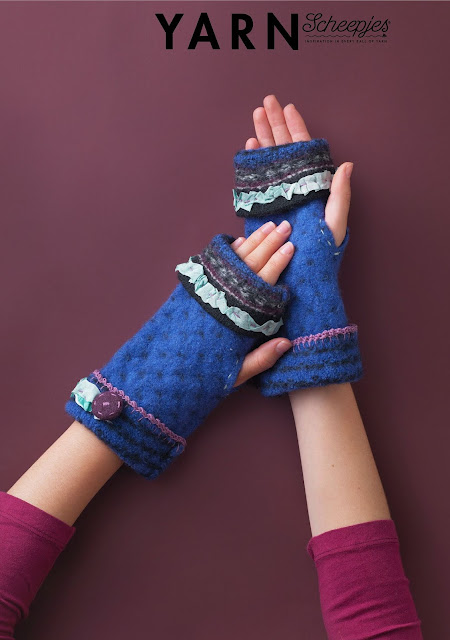
Ever since discovering the magic of felting, I'm honestly gleeful when I get to create anything with the technique. Recently I was asked to design a pair of felted mitts for the newest issue of Scheepjes YARN Book-a-Zine Tea Room*. Off to the thrift store I scurried to find the perfect wool sweater/jumper that could be upcycled into some handwarmers. Needless to say, I hit the jack-pot with a beautiful blue and purple vintage fair-isle cardigan! But let me show you the mitts first, in all their felted and finished glory.


Yarn Book-A-Zine Tea Room | Felted Mitts made by Susan Carlson of Felted Button | Colorful Crochet Patterns
Photo used courtesy of Scheepjes.

Let me tell you how they came to be and hopefully I can infuse a little courage so you'll want to try making your own pair, too. As soon as I got home I threw the cardigan in the washing machine on a super hot wash-cycle with a couple of other non-shedding items, a teeny bit of soap, and held my breath. When the cycle was done, I was gleeful as the sweater felted beautifully--albeit a LOT! It went from a medium adult to small enough for a 2 year old with the entire sleeves being just long enough for my vision for an adult mitt. (Phew--it's the unknowns you sometimes get with this felting gig.) Notice how I felted it until the stitches disappeared leaving me with a dense and durable fabric.


After gathering some supplies like Scheepjes Sweet Treat* for some impromptu embroidering on the mitts, some silk ribbon scraps, scissors, measuring tape, 3mm crochet hook, chalk, needle, and buttons stolen from another wool cardi, I was ready.


Scheepjes Sweet Treat and silk ribbon used for Felted Mitts designed by Susan Carlson of Felted Button for the Scheepjes YARN 8 Book-a-zine Tea Room
I ended up using Sweet Treat colors #402 Silver Green and #240 Amethyst.

First thing I needed to do was cut the sleeves from the sweater.


Since I so effectively shrank the sweater, what I had was a sleeve length about 12" (30.5cm) long. To start, I wanted every bit of that length--because I could always trim some later, if needed.


I also knew I was going to fold both ends of the mitts for some interest so that gave me some flexibility in length because I could adjust the width of the folded cuff. Next I needed to cut some thumb holes. I first marked mine with some chalk--about 4.5" (11.5cm) from the finger-end of the cuff--then cut it with sharp scissors approximately 1.4" (3.5cm) long, or whatever length is comfortable for your thumb. Also, I placed the thumbhole cuts close to the seam rather than directly on it.


I folded the finger end down 2.2" (5.5cm). Then I intentionally created a messy, contrasting running stitch with my Sweet Treat through some lovely, crumpled silk ribbon around the edge of the cuff for an Anthropologie-esque feel. (Plus, for those of you who are not masters at embroidery, it makes it much less intimidating, right?) 


I was definitely not going for perfect here. Remember, this is supposed to be a creative process with some whimsy and interest!


Then using another contrasting color of Sweet Treat--this one matching the ribbon, I did another simple running stitch around the thumb hole. Keep in mind, this is only decorative because the felted fabric is so durable, it will not split or fray when cut--did I say magic?


Then I decided to fold the wrist end down about 1.5 " (4cm) to show off the neat lines created from the fair-isle stitching of the sweater. I like the contrast that it presents against the wee "v's" on the right side of the fabric. The buttons which I cannibalized from another felted sweater in deep purple were perfect--not only because of their color, but because they could also be embroidered. Now let me share with you how I completed the crocheted detail at the wrist end of the mitts.


I started with a blanket stitch. Insert your needle as shown above--under the cut edge to about .5" (1.25cm) from the edge. 


Then pull your thread through, but before pulling tightly, insert your needle through the loop you've just made from right to left. This will pull your stitch over so it is perpendicular to the fabric's edge. I always try to make my stitches as "square" as possible by making the distance from the cut edge to the top of the stitch the same as the distance between each stitch. This makes for little "boxes". But, remember, we're going for creative process here, so don't stress too much if they are not perfect.


After my blanket stitch is complete, I use it as a foundation for crocheting my little scalloped edging. (Don't worry about right or wrong side here--it looks awesome on both sides.) Here's how I did it (US crochet terms):

sc = single crochet
hdc = half double crochet
sl st = slip stitch

With a slip knot on your hook, insert your hook under one of the horizontal loops of your blanket stitch, as shown above, yarn over and draw up a loop, then yarn over and draw through both loops on your hook. Sc join complete.
Now, (hdc, sl st) in the same loop as joining, (sc, hdc, sl st) in each horizontal loop around, join to first sc, fasten off and weave in your ends. 

Easy peasy, huh?


Like I mentioned I also added some simple embroidery to the buttons since they were fabric covered and attached them to the wrists--with some bonus ribbon tacked down around the outer part of each wrist's edge. Now it's time to make your second one--be mindful of the positioning of your thumb slit and you're off!


I also embroidered a few little V's on the body of the cuff for additional detail. 


Ta-Dah!!


Yarn Book-A-Zine Tea Room | Felted Mitts made by Susan Carlson of Felted Button | Colorful Crochet Patterns
Photo used courtesy of Scheepjes.

I would love to see yours if you give this a go! Please share your makes to social media by using #SimysChallenge. You can also share any crochet happenings in your world of the upcycled, colorful, felted and yarny variety in my Felted Button Crochet Community Facebook group here. And if you want to check out the other really phenomenal--and I mean, phenomenal, beyond-any-other type-of-crochet-designs-you-can-find-anywhere, fit-for-a-runway phenomenal--check out the newest issue of YARN Book-a-Zine available from Wool Warehouse here*.
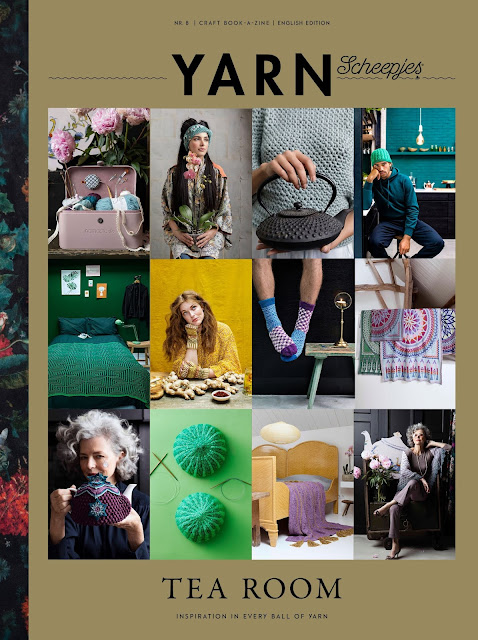
Yarn Book-A-Zine Tea Room | Scheepjes, Edition 8
Photo used courtesy of Scheepjes

It's all sheer elegance and beauty! As are you...

| On the Board | -- When it rains, look for rainbows. When it's dark look for stars.
*This post contains affiliate links.

8.12.2019

Free Crochet Pattern | Rinske Square

Let me introduce you to my latest free crochet granny square I've named Rinske. I've partnered with the talented Julie Yeager Designs and her 2019 Block a Week series to share with you a 12" (30.5cm) square that's loaded with typical Felted Button color and texture. 


Rinske Square | free crochet pattern by Susan Carlson of Felted Button -- Colorful Crochet Patterns made with Scheepjes Chunky Monkey

8.07.2019

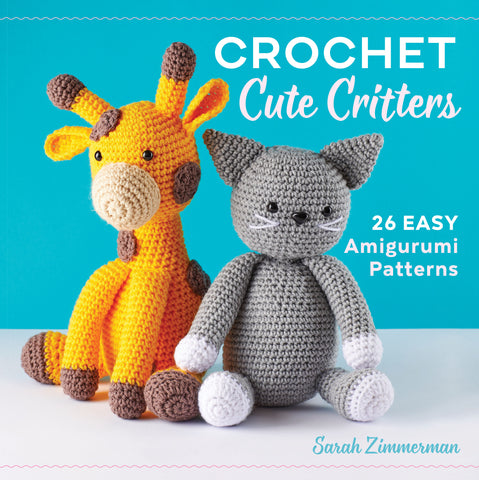
Book Review, Crochet Cute Critters

When I first picked up my hook as an adult to begin crocheting, I did as I typically do when learning new things...I try the skill in as many ways as possible. That meant: something flat in rows, something flat in the round, mixing up stitch placements, shaping with short rows, and on and on. One of the techniques I really had fun with was making amigurumi--those soft and 3D toys and objects that are so cute and full of variety. My boy was young, and he loved the squishy little critters I made him that could be so personalized--and the pretend that was possible with them. Today I'm hopping in to share with you the perfect book for a beginner to have a go at making an alphabet of amigurumi critters.

Book Review by Susan Carlson of Felted Button | Colorful Crochet Patterns: Cute Crochet Critters by Sarah Zimmerman

7.26.2019

Waikiki Wildflower Blanket Pattern Anew

When I contemplate the beginnings of Felted Button, one of my fondest memories is the creation of my Waikiki Wildflower Blanket inspired by my trips to the beaches of Hawaii. The yarn that I used to make it was a brightly-colored superwash wool that has since been discontinued, so I decided an update was in order.

I recruited the help of a friend, Sabrina, who has a knack with both crochet and photography. You can see some of her beautiful crochet on Instagram at SabrinaStitches. She offered (or rather I coerced her) to remake the blanket with some bright and happy Scheepjes Cahlista* a delightfully soft and "easy-on-the hands" no fuzz, 100% cotton yarn. Wanna see?


Photo used courtesy of Sabrina Newton.

7.15.2019

Prism Blanket Make-a-Long MAL

I'm thrilled to be announcing something that's been in the works for quite some time now...


So what's a Scheepjes Make-A-Long (MAL), you may ask? It's a bit like having your own personal crochet club, one that meets at your convenience from the comfort of your own home and joins together with friends to crochet a project, share progress, ask questions and rejoice in your love for crochet and yarn! I'm tickled that for this MAL we will be making one of my designs--a colorful blanket with lots of texture, color and interest called the Prism Blanket. 

6.21.2019

Riverstone Asanas -- Updated Blanket Pattern

One of the most gratifying things about designing crochet patterns is seeing what people are able to do with my patterns as a spark of inspiration to make a piece uniquely their own. Just recently, a fellow crocheter, April, shared with me a little tweaking she did with my Asanas Blanket pattern. 


Riverstone Asanas Blanket -- free crochet pattern
Photo used courtesy of April Luescher
Isn't it beyond lovely!? And she has been kind enough to write up all the details for you so you can make one of your own. Here's April...

5.07.2019

Scheepjes Yarn Reef and Skies

Some crochet can be ugly. I'll admit it. Sometimes it's just lumpy, old-fashioned and tacky. But then there's that crochet that makes your heart sing--that is true fiber art--beautiful, functional, stylish, trend-setting. YARN book-a-zine is all of that and more. The newest edition of the book-a-zine was just released and it is a sight to behold, I tell ya!


YARN Book-a-zine Reef (issue 7)

Not a tacky or unstylish thing in there--just mind-blowing creative bliss.

Here are just a few of my favorites from this issue...

4.26.2019

Window to the Whirl Part 2

Last week I shared the free crochet pattern for Part 1 of my Window to the Whirl Blanket which included the panel with the nifty little "windows" created by the intermeshing crochet technique. Today I'm sharing Part 2 of the blanket. This section, made with its own coordinating Scheepjes Whirl, is really rhythmic and relaxing but perfectly highlights the gradient fade of the yarn. Let's get on with the details of how you can crochet your own.

Window to the Whirl Blanket (free crochet pattern) using Scheepjes Whirl. Designed by Susan Carlson of Felted Button.

When you've completed your intermeshing panel, grab your second whirl. The one below is Murderous Mint (C) from the Scheepjes Whirl Ombre Collection and your Whirlette in Liquorice (A), and poise that hook.

4.19.2019

Window to the Whirl Free Crochet Pattern Part 1

The flowers of spring are now officially proclaiming their presence here in Utah--the pinks and purples of the phlox, the vibrant red tulips, the bright white blooms of candytuft, the pale pink floral popcorn adorning the cherry trees, and brilliant yellow of the creeping buttercups. They all make me happy as they foretell of the warm and colorful days of summer. But no matter the time of year, my hook stays busy trying to keep up with the colorful ideas in my head. Remember my Window to the Whirl Blanket that I shared here?


Window to the Whirl Blanket (free crochet pattern) made with Scheepjes Whirl and Whirlette

Today I'm sharing Part 1 of the crochet pattern with you. Why only Part 1? I quickly realized during the pattern writing phase, that this pattern took a little bit of explaining beyond what some other designs might require. And a blog post with the whole pattern might be a bit overwhelming for you and for me. So I'm sharing Part 1 today, and will provide Part 2 next week in a separate post to simplify things a bit. Next week the PDF for the whole pattern will be available for a small fee--ad-free and with all the pictures in a section together so printing is easy peasy.

So let's get on with the pattern for Part 1, which is this panel--Section 1...

4.05.2019

Window to the Whirl Blanket Reveal

In my part of the world, the crocuses and hyacinths have peeked through the ground, the forsythia is shouting in bright yellow blossoms, and in some southern facing flower beds the daffodils are in bloom! I'm still waiting on the tulips, but it will be soon, very soon. All these flowers spark my dream of opening my own flower shop one day. For now, I'm happy to sit and crochet in the crisp spring air that smells of freshness and sounds of birds getting ready for new birth. Today I even put out my wee table and green chairs--perfect for crocheting outdoors.

Speaking of crochet...remember the yarny peek I showed you last week?  I've since worked out the border and my Window to the Whirl Blanket is officially finished!

Window to the Whirl Blanket (free crochet pattern) by Susan Carlson of Felted Button

You Might Also Like::

Related Posts Plugin for WordPress, Blogger...