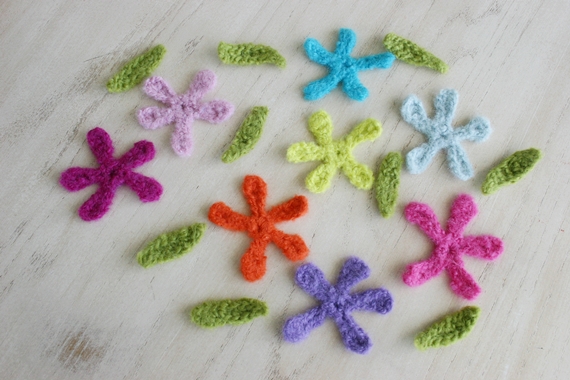
I wanted a little garland similar to this one on my light fixture in my dining room--something long and colorful and simple that I could hang or drape anywhere. Adds a little color and whimsy, I think. So
I started by picking some fun colors of yarn and working up some wee flowers.
Want to know how I did it? Well, certainly, my friend. Here goes...
Materials:
--H (5mm) hook
--Felt-able wool bits if you want to felt your flowers or any yarn of your choice in your choice of colors. Mine was light worsted and 100% wool. (Felting instructions below--don't be worried, it is super simple!)
--Yarn or string for "stringing" your flowers
--Rubber gloves
--Small drops of liquid soap (any soap will do, actually)
Flower--
--ch 3, sl st to the first ch to form a ring
Rnd 1: (ch 7, dc in 4th ch from hook, hdc in next ch, sc in next ch, sl st in next ch, sl st to center of ring) rep 5 times
--Fasten off and weave in ends
Leaf--
--ch 9, sl st in 2nd ch from hook, sc in next ch, hdc in next ch, dc in next 2, hdc in next ch, sc in next ch, sl st in last ch
--Fasten off and weave in ends
Felting--
If you have never felted before, have no fear! It is super easy. Some things to know about this terrific process:
--Felting takes place with hot water and agitation. The fibers of the wool will bind with adjacent fibers and make the stitches magically disappear which leaves you with a beautiful, dense fabric. It will also make the piece smaller.
--Felting is more of an art than a science. You never get the exact same thing twice. Different types of wool will felt differently. Different colors will felt differently. (Hint: Light colors are slower to felt, so be patient, especially with white!)
--Soap facilitates the felting, but you don't need much.
Here is how I do it with little pieces like this...
Gather your gloves and soap. The gloves will protect your hands from the VERY HOT water, as well as the friction against your skin. (I have done this without gloves and my hands feel like they have carpet burns when I am done--not suggested!) Gloves work splendidly!
Wet your pieces in very hot water. Add a drop of liquid soap. Rub and roll between your palms, vigorously. You can rinse occasionally with water as needed. Check your pieces periodically to see if you can see the stitches. Just keep felting. Just keep felting. It really only takes a minute or two. Rub, roll, rinse, etc. When the stitches are gone and the pieces tightly felted, rinse. Squeeze out any excess water and set aside until all of your felting is done.
This part will take a little pulling and tugging. You will need to pull and stretch your pieces into the shape you want them. Be certain to do this when they are damp. But the cool thing is the felt is so tough you have no fear of damaging them. So go to town and get them to look the way you like. Leave them to dry.
I like to trim the edges of extra little fuzzies that make the margins look not-so-tidy. And because the stitches are fused, there is no worry they will come apart. Neat-o, huh?
I chose some fun, colorful yarn to string my blooms onto and used a tapestry needle to do it. First the leaf...
And then the flower...
Space them how you like and hang! I'm thinking that a curtain of these over a window would be ever so terrific and happy!
I hope you enjoy this little crochet project and if you make it, please share. I love to see other people's personalities in their versions of my creations. You can share pictures on the Felted Button Facebook page. Click here to "like" the page and keep in the "Button" loop.
Hugs.
{On the Board} -- If you're feeling blue, try painting yourself a different color. --Hannah Cheatem, Age 8


So colorful and happy :)
ReplyDeleteSo very cheerful! I wish I could make one of my own. Beautiful way to bring the feel of springtime inside. :)
ReplyDeleteSo happy and colourful, just like you :)
ReplyDeleteNeed some reminders that Spring is coming, it's SO cold over here!